What Are Teams?
In Achieve Connect, Teams are used to group advisors and learners into distinct permission-based units. Each Team acts as a container that controls which learners an advisor can view and manage. This structure is especially useful for financial institutions that work with multiple advisors or branches and want to ensure data privacy and localized reporting.
Note: Teams are only available in Achieve Connect, not in standard Achieve. If you're unsure which version you're using, check with your Customer Success Manager.
Why Use Teams?
Teams help you:
- Segment learners by advisor, branch, or region
- Restrict advisor access to only their assigned learners
- Enable personalized branding and contact info per team
- Simplify reporting by grouping learners under their advisor’s team
- Automate learner assignment through invitation-based registration
How Teams Work
Each advisor is assigned as a Team Manager. When a learner registers using that advisor’s invitation link, they are automatically added to the advisor’s team. This ensures that advisors only see the learners they’ve invited and can manage their progress, reporting, and communications accordingly.
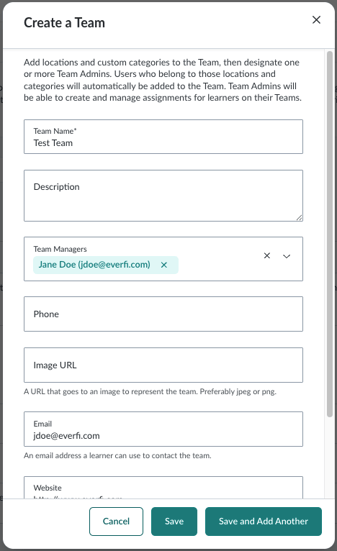
How to Create a Team
-
Go to Users > Teams
-
Click Create New Team in the upper right
-
Fill in the required fields:
- Team Name (e.g., “Downtown Branch” or “Advisor Smith’s Clients”)
- Team Managers (select one or more advisors from the dropdown)
-
(Optional) Add public-facing details:
- Description: A short summary of the team
- Phone: A contact number for learners
- Image URL: A logo or photo to represent the team (JPEG or PNG)
- Email: A contact email for the team
- Website: A link to the team’s site or advisor profile
-
Check the box for Invitation-Based Team to automatically assign learners to this team when they register via an invitation.
-
Click Save
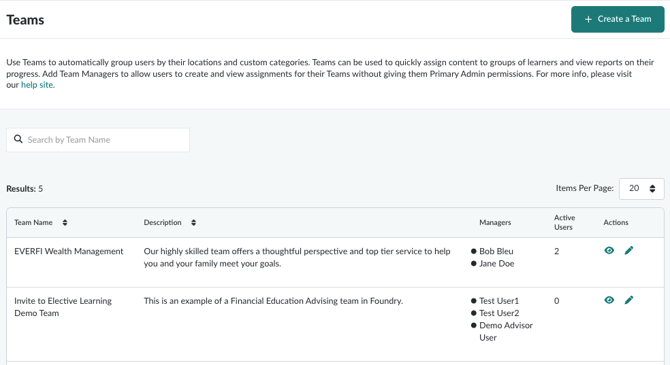
How to View and Edit Teams
To manage existing teams:
-
Go to Users > Teams
-
You’ll see a list of all teams you belong to or manage
-
Use the View icon in the Actions column to see team details, including:
- Team name and description
- Team Managers
- Number of active users (learners)
- Contact information
-
Click Edit Team Info to update the team’s name, managers, or public-facing details
Best Practices
- Create one team per advisor to ensure clean data segmentation and reporting
- Use consistent naming conventions (e.g., “Advisor - Last Name” or “Branch - Location”)
- Enable invitation-based teams to streamline learner assignment
- Keep contact info updated so learners know how to reach their advisor
- Use team-level branding to personalize the learner experience